That sick feeling hits your stomach as you stare at the cut strap, knowing over $300 worth of hard-earned money is gone. Months of deer patterns, that perfect buck you’ve been tracking, your entire scouting strategy—wiped out by some lowlife with wire cutters.
Trail camera theft isn’t just happening to the other guy anymore. Theft can happen anywhere, even on private posted property, and it’s getting worse every year. Hunters are fighting back with smarter security tactics, better equipment, and strategies that actually work.
Here’s what we’ll cover to protect your investment:
- Security devices that make thieves move on to easier targets
- Placement tricks that keep cameras hidden from prying eyes
- Advanced tactics for high-risk areas and repeat offenders
Time to turn the tables on these camera thieves.
The Real Cost of Trail Camera Theft
A single trail camera runs $200-$500, but most serious hunters run multiple units. Lose three cameras in one season? You’re looking at $1,500+ down the drain, not counting all the accessories and SD cards.
The real kick in the teeth? You lose way more than hardware. Potential thieves know many hunters use trail cameras because hunters are often away from their hunting areas for a while. They’re banking on you being miles away when they strike. All those deer patterns, feeding times, travel routes—gone. You’re back to square one while some scumbag probably pawned your camera for drug money.
Here’s the reality check: nothing stops a determined thief with power tools and time. But you don’t need Fort Knox security. You just need to be a harder target than the next guy’s unprotected camera down the trail.
Your First Line of Defense: Security Devices That Work
Think of security devices like wearing your safety harness in a tree stand. It’s basic protection that every hunter needs, and it works against most threats you’ll face.
Python Cable Locks
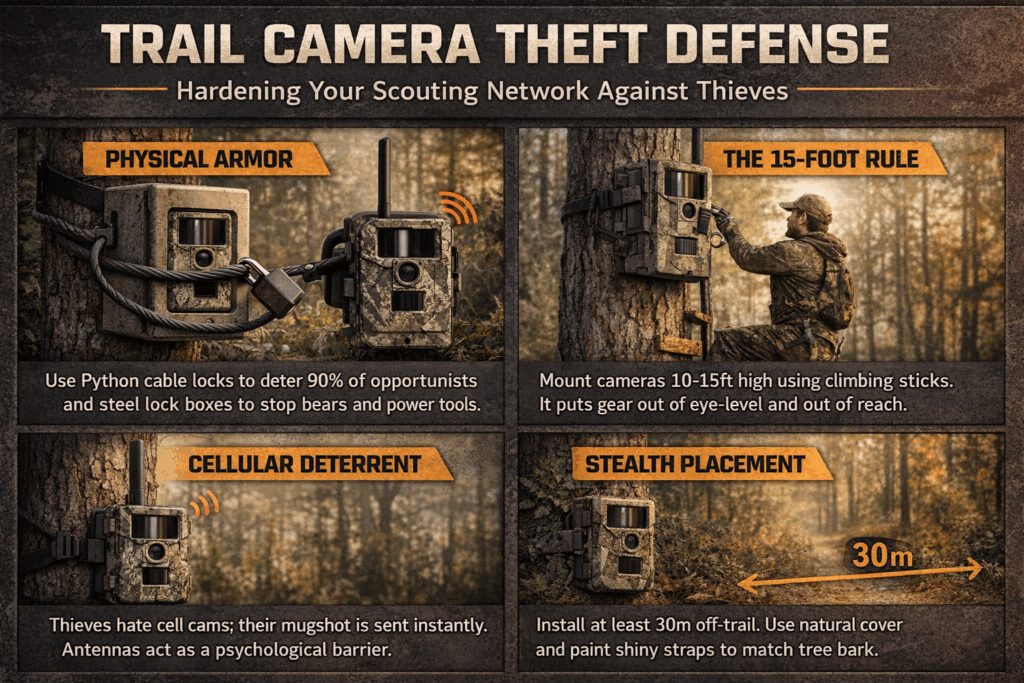
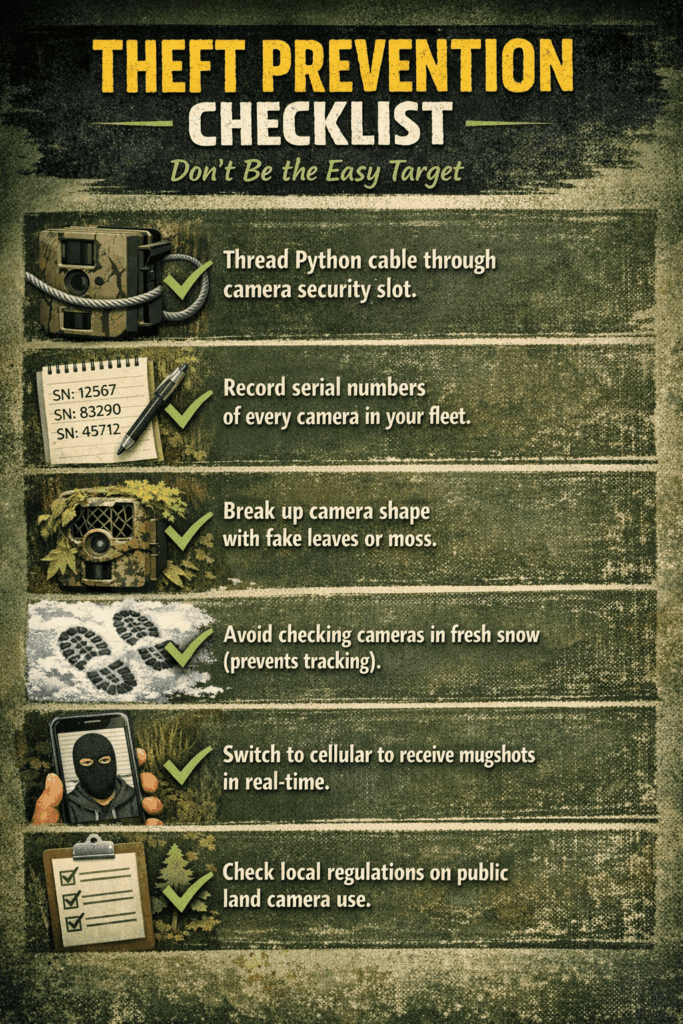
Every trail camera placed on public land should be firmly locked to the tree with a python-style cable lock. These flexible steel cables thread through your camera’s security slot and wrap around the tree. Simple concept, but it stops 90% of opportunistic theft.
Most thieves are lazy. They’re walking trails looking for easy scores, not planning elaborate heists. Securing a camera in a steel security box and cabling it to the tree with a Master Lock Python Cable can go a long way to keeping honest people honest. When they see that cable, they usually keep walking.
Smart hunters look for cameras with extra security features. Some cameras feature additional holes to lock the camera shut, which is a useful option to prevent tampering and SD card theft. Even if they can’t steal the whole camera, they might grab your SD card with weeks of scouting data.
Trail Camera Lock Boxes
Steel security boxes are like armored trucks for your cameras. They completely encase the unit while leaving the lens and sensors exposed. Bears can’t destroy them, thieves can’t easily grab them, and your camera stays protected in nasty weather.
The downside? They’re heavy and bulky. The downside to security boxes is the added bulk, so they can be impractical when trekking out with a backpack full of cameras. But for high-risk spots or cameras you can drive close to, they’re worth every ounce.
Lock boxes shine in specific situations:
- Public land with known theft problems
- Locations near roads or parking areas
- Food plot monitoring (where legal)
- Areas with destructive wildlife
Security boxes can be especially useful when monitoring curious wildlife, when the camera needs to be protected from large jaws, paws and hooves. Nothing worse than finding your camera destroyed by a curious bear.
Need to armor up your cameras? Check out our security accessories to find the right protection for your setup.
Strategic Placement: Location and Height Matter
The best lock in the world won’t help if you hang your camera like a neon sign next to a parking area. Smart placement keeps cameras invisible to thieves while capturing the wildlife footage you need.
The 15-Foot Rule
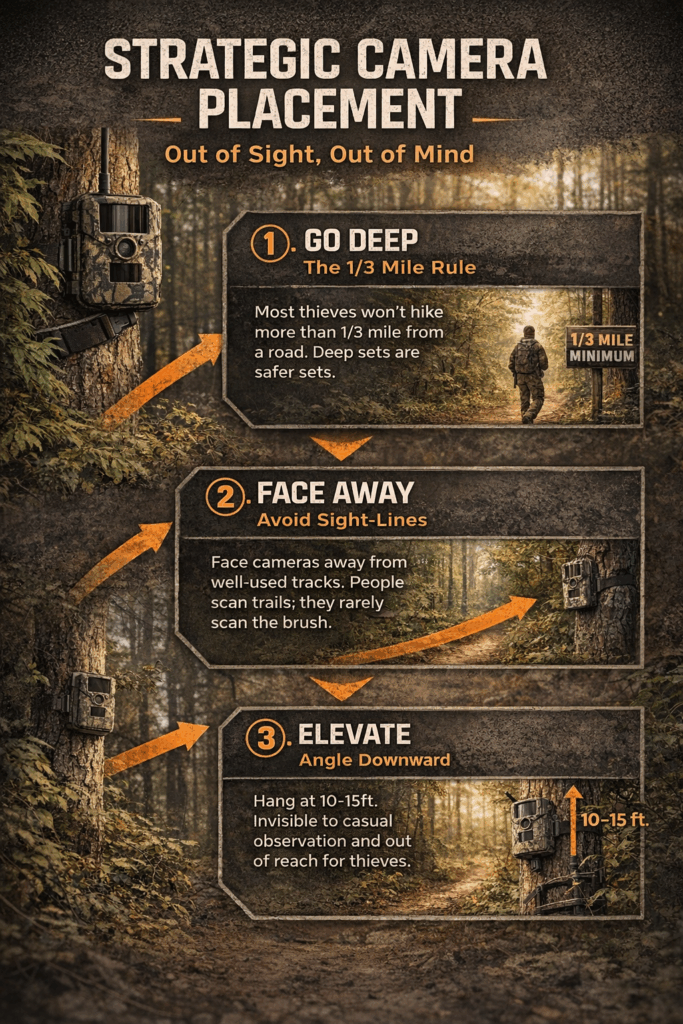
I take my climber in with me now when setting cameras and typically place them 15 feet up the tree angled back down. This advice from Browning’s experts solves multiple problems at once.
Height gives you triple protection:
- Invisible to casual observation – People scan at eye level, missing elevated cameras
- Out of reach – Requires ladders or climbing gear most thieves don’t carry
- Better for deer – Hanging cameras high and outside the natural line of sight makes them less obvious to thieves while also reducing visibility to bucks sensitive to cameras
Yeah, it’s more work. You need climbing sticks, a safety harness, and extra time for setup. But even hanging the trail camera about 10 feet high in the tree and angling it downward puts it out of reach for most thieves and animals.
The right mounting gear makes high placement much easier—check out our mounting systems designed for secure, elevated installations.
Distance from Roads and Trails
Research by Penn State University found that the vast majority of deer hunters don’t venture over 1/3 mile from a road. Thieves are even lazier than lazy hunters. They’re not hiking deep into the woods when there are easier targets near the parking area.
Smart placement rules:
- Face away from high-traffic areas – Facing cameras away from roads and well-used trails can prevent theft, and placing cameras 10-20 feet away from trails in brush is preferred
- Get off the beaten path – Installing cameras at least 30 metres from the nearest track or trail and facing them away from nearby trails and lines of sight
- Use natural barriers – Put cameras behind brush piles, fallen logs, or terrain features that block them from view
The deeper you go, the safer your cameras get. Make thieves work for it, and they’ll usually find easier targets.
Camouflage and Concealment
Even “camo” cameras stick out like sore thumbs if you don’t conceal them properly. The goal is breaking up that artificial camera shape that screams “expensive electronics here!”
Proven concealment tricks:
- Break up the outline – Using fake leaves and moss purchased inexpensively online or in decoration sections can help break up the shape of a trail camera
- Fix the strap problem – The strap that comes with the trail camera may become the reason why a theft happens, as it gets too long and sways in the wind. Painting the strap to make it less contrast against tree bark further camouflages the trail camera
- Pick the right trees – Rough, textured bark hides cameras better than smooth-barked trees
- Use natural cover – Partially hide cameras with branches and leaves without blocking the sensors
You want to fool human eyes while still getting great wildlife photos. Good concealment often beats expensive locks.
Cellular Cameras: Your Eyes When You’re Not There
Cellular trail cameras are game-changers for theft protection. They don’t just secure your camera—they create a psychological barrier that makes thieves think twice about messing with your setup.
How Cellular Cameras Deter Theft
Cell cameras have been perfect. Nearly everyone avoids them. This real-world feedback from hunters shows the psychological power of cellular technology.
Here’s why thieves hate cellular cameras:
- Their photo is already sent – Even if they steal the camera, you have their picture
- Real-time alerts – You might be driving to the location within minutes
- Technology intimidation – That cellular antenna screams “advanced monitoring system”
Cellular trail cameras like Moultrie Mobile allow you to receive real-time images, even if the camera is stolen. They can take your hardware, but you’ve got their mugshot and the exact time they were there.
Practical Benefits Beyond Security
Cellular cameras transform how you hunt while providing theft protection:
Fewer trips to check cameras means less scent in your hunting area and fewer trails for others to follow to your camera locations.
Real-time deer intelligence lets you adjust your hunting strategy based on current activity, not week-old photos from SD cards.
Better operational security because making frequent trips to check cameras can scare off wildlife. Cellular cameras eliminate this compromise between monitoring and wildlife disturbance.
Ready to upgrade your scouting while adding serious theft protection? Browse our cellular cameras and hunt with confidence knowing your cameras are working—and protected—24/7.
Advanced Security Tactics
For high-risk areas or hunters who’ve been burned before, these advanced strategies add extra layers of protection and help catch the bad guys.
The Decoy Camera Strategy
Set up a visible “bait” camera in an obvious spot, then hide a second camera watching the first one. Using a decoy camera in plain sight with a concealed camera pointing back at it can catch thieves, with one hunter capturing a picture of a thief and his girlfriend stealing the visible camera.
This works great in known problem areas or when you want to identify who’s been snooping around your hunting spots. Use an older, cheaper camera as bait while your good camera gets the evidence.
GPS Tracking Options
Some newer trail cameras include GPS tracking. If a trail camera has a GPS tracker, you can easily find its location even after the thief takes it away. Certain game cameras now come with built-in GPS tracking capabilities, such as the Moultrie Mobile Edge 2 Pro.
Don’t expect miracles from GPS tracking. It’s better for recovery than prevention, and it only helps if law enforcement actually follows up on your theft report.
The “Official Property” Deterrent
Some hunters get creative with official-looking deterrents. When hunting federal government land, tags stating “This camera is the property of such-and-such wildlife agency and are being used for deer density surveys…DO NOT REMOVE” were effective.
Important: Only use this if you have legitimate permission or are actually conducting surveys. The idea is that “official” equipment gets left alone more than personal hunting cameras.
Maintenance and Check Frequency
Balancing security monitoring with smart hunting practices requires strategic thinking about when and how often you visit your cameras.
Here’s the dilemma: you want to make sure your cameras are still there and working, but every visit creates problems. Making frequent trips to check cameras can scare off wildlife. Plus, every trip leaves scent and creates trails others can follow to your camera locations.
The fresh snow disaster is a classic mistake. Checking cameras after a fresh snow can increase theft risk, as evidenced by one hunter losing 6 trail cameras in a single day. Your tracks lead thieves directly to every camera like a treasure map.
Power management affects security. Reliable batteries mean fewer check trips and longer deployment periods. Quality batteries can last 9+ months with frequent use, while solar panels can extend deployment indefinitely.
Investing in quality power solutions means fewer trips to your cameras—better for your hunting success and your security.
Know Before You Go: Essential Hunting Prep
Protecting your trail cameras is just part of successful hunting. Let’s cover the other essentials that turn good scouting into filled tags.
Regulations Check
Trail camera rules change constantly and vary by state. Some restrict cellular cameras during hunting season, others have specific public land rules. Before you deploy any cameras, check your state’s current regulations for both trail cameras AND general hunting rules.
Critical step: Get your licenses and tags early. All the scouting intelligence in the world doesn’t matter if you don’t have proper licensing, and limited tags sell out fast in prime hunting areas.
Scouting and Habitat
Your secured cameras should target the most productive habitat during hunting season. Focus on transition zones between bedding and feeding areas, water sources during dry spells, and natural funnels that concentrate deer movement.
Look for these key signs: fresh tracks in mud or soft soil, rubs on trees (especially large diameter rubs), scat concentrations showing regular use, and feeding areas with fresh browse or crop damage.
Tech advantage: Use GPS mapping apps to pre-scout potential camera locations and mark productive areas. This reduces field time and helps you plan security approaches before you arrive.
Physical and Gear Readiness
Mounting cameras 15 feet high requires physical ability and proper equipment. Practice with climbing sticks and safety gear before heading to your hunting area. The extra effort pays off in both security and reduced wildlife disturbance.
Gear matters: Reliable equipment makes the difference between successful hunts and frustrating failures. Quality gear performs when conditions get tough and gives you confidence to hunt effectively.
Core Gear Checklist: Our Top Recommendations
Success in the field depends on having the right equipment for your specific hunting conditions and target species.
Clothing and Layering
Start with moisture-wicking base layers (synthetic or merino wool), add insulating mid-layers for temperature control, and top with weather-resistant outer shells for wind and rain protection. Choose camo patterns that match your hunting environment and season—early season needs different concealment than late season.
Quality insulated hunting boots provide warmth, comfort, and silent movement during long sits and stalks. Cold feet end hunts early and kill your effectiveness.
Weaponry and Ammunition
Rifle hunters: Match your caliber to your target species and expected shot distances. Practice regularly with your hunting setup—accuracy from a bench rest is different from field conditions.
Archery hunters: Make sure your bow is properly tuned and practice from elevated positions if you’ll be hunting from tree stands. Broadhead selection affects both accuracy and killing power.
Essential practice: Shoot from hunting positions, wearing hunting clothes, at distances you expect to encounter game.
The Essentials: Navigation and Safety
Must-have equipment includes GPS device with preloaded maps and waypoints, compass for backup navigation, paper maps of your hunting area, first aid kit for your hunting environment, emergency communication device (satellite communicator for remote areas), headlamp with extra batteries, quality skinning and butchering knives, disposable gloves for field dressing, and game bags for meat protection and transport.
Tactics and Strategy: Maximizing Your Investment
Your secured trail cameras provide intelligence that drives hunting strategy. Here’s how to convert that information into hunting success.
Peak Activity Times
Most deer move during low-light periods—early morning and late evening. Your trail camera data reveals specific timing patterns for your hunting area, but plan hunts around these natural activity peaks.
Pattern recognition: Look for consistent timing in your photos. Deer often use the same routes at similar times, especially during pre-rut and rut periods.
Wind and Scent Control
Wind direction determines hunting success more than any other factor. Your cameras show where deer travel, but you must access those locations without contaminating them with human scent.
Plan multiple stand locations for different wind conditions, use scent-eliminating products on clothing and equipment, access stands from downwind directions when possible, and consider thermals and air currents, not just surface wind.
Our scent control products help you stay undetected when hunting the locations your trail cameras reveal.
The Approach: Stand Placement and Tactics
Position stands based on prevailing wind directions, consider multiple access routes to avoid establishing patterns, plan shooting lanes and range estimation points, and account for seasonal changes in vegetation and deer behavior.
Shot placement ethics: Understand vital zones for clean, ethical kills. Practice shot placement from your hunting positions and know your effective range limitations.
Post-Harvest Care: The Work After the Shot
Success doesn’t end with the shot—proper field care ensures your harvest provides quality meat for your table.
Tracking and Recovery
Mark the last blood sign before searching ahead, look for blood at deer height and below, move slowly and systematically, and bring help for recovery in difficult terrain. Give wounded animals time to expire—pushing too quickly can result in lost game.
Field Dressing
Cool the carcass quickly by removing internal organs promptly, keep meat clean using clean knives and avoiding contamination, and protect from insects using game bags and rapid cooling. Cool weather simplifies field care, but warm weather requires immediate attention.
Transport and Processing
Plan transportation before the hunt, keep meat cool during transport, process promptly or get to a professional processor, and package properly for long-term storage.
More Resources from Hunting Locator
Expand your hunting success with these additional resources:
- Trail Camera Store – Complete selection of cameras, security accessories, and mounting systems
- Cellular Trail Cameras – Real-time monitoring solutions with theft deterrence
- Security Boxes and Locks – Physical protection systems for your camera investment
- Power Solutions – Extended battery life and solar panels for long-term deployment
- Mounting Systems – Professional mounting hardware for secure, elevated installations
FAQ
How effective are python cable locks against determined thieves?
Python cable locks stop opportunistic theft but won’t stop someone with bolt cutters. Securing a camera in a steel security box and cabling it to the tree with a Master Lock Python Cable can go a long way to keeping honest people honest. They’re your first line of defense, not your only protection.
Should I use cellular cameras on public land?
Cell cameras have been perfect. Nearly everyone avoids them. Cellular cameras provide excellent theft deterrence on public land, but check your state’s regulations first—some states restrict cellular camera use during hunting seasons.
What’s the best height for mounting trail cameras?
I take my climber in with me now when setting cameras and typically place them 15 feet up the tree angled back down. Fifteen feet provides excellent security, but even 10 feet off the ground keeps cameras out of reach.
How often should I check my trail cameras?
Making frequent trips to check cameras can scare off wildlife. Check cameras monthly at most, and never check after fresh snow when your tracks lead directly to camera locations.
Do security boxes work against bears?
Yes, security boxes can be especially useful when monitoring curious wildlife, when the camera needs to be protected from large jaws, paws and hooves. Quality steel boxes protect against both theft and wildlife damage.
What should I do if my trail camera gets stolen?
Report the theft to local law enforcement with your camera’s serial number and identifying information. Knowing your device’s serial number and identification information allows local law enforcement and wilderness supply stores to identify your camera.
The Final Shot
Trail camera theft doesn’t have to ruin your hunting season or empty your wallet. Smart security measures—from python locks to cellular monitoring—dramatically cut your risk while smart placement strategies keep your cameras invisible to thieves. The trick is layering multiple security approaches instead of relying on just one solution.
Your trail cameras are more than equipment; they’re your intelligence network in the woods, gathering the information that separates successful hunters from guys who just hope for the best. Protect that investment with proven security methods, and you’ll hunt with confidence knowing your scouting network is working even when you’re not there.
Ready to secure your cameras and dominate this hunting season? Visit our trail camera store for the best security boxes, cellular cameras, mounting systems, and power solutions. Protect your investment and hunt with confidence!