This guide pulls together hard-won knowledge from hunters who’ve spent decades glassing western mountains. Industry expert Todd Hodnett puts it plainly: “Your spotter needs to see more than you shoot. Good glass isn’t optional—it’s survival, accuracy, and effectiveness.”
You’ll discover:
- Proven glassing systems that actually find animals (not just burn time)
- How to set up spotting scopes and tripods so they work with you, not against you
- What elk, mule deer, and other western game do when they think nobody’s watching
But here’s the thing—great glassing starts before you even touch your optics.

Know Before You Go: Essential Prep
Most hunters get so excited about their new spotting scope that they skip the boring stuff. Big mistake. The difference between success and frustration often comes down to preparation that happens weeks before opening day.
Regulations Check
Western hunting regulations aren’t suggestions—they’re complex, constantly changing rules that vary wildly between states and even individual units. Miss something here and your hunt’s over before it starts.
You need to understand tag and license requirements (resident vs. non-resident fees can be shocking), exact season dates and legal shooting hours, weapon restrictions that might affect your unit, access rules for public lands including wilderness restrictions, and precise game management unit boundaries.
Here’s the reality: many western states require applications months before seasons open. As experienced hunters note: “Hunters mark everything in their onX app—waterholes, access gates, rut sign, road forks, obstacles” because smart hunters use every tool available.
Scouting & Habitat: Reading the Landscape
The number one thing to look for is a water source. No water within a few miles? You’re wasting your time. Animals need water to survive, and in arid western climates, water sources concentrate game like nothing else.
Understanding where animals actually live during hunting season beats random glassing every time. Elk love middle elevation timber during September rut, especially transition zones between trees and meadows. Mule deer scatter everywhere from desert foothills to alpine basins—they’re trickier to pattern. Pronghorn stick to open country where they can spot danger coming.
When you’re glassing, these signs tell you you’re in the right place:
- Fresh trails and scat (not last year’s dried-out pellets)
- For elk: active wallows and fresh rubs on trees—bulls leave obvious calling cards
- Bedding areas where deer rest on shaded slopes with good views, elk bed in groups on protected benches
- Water sources and the highways animals use between feeding and sleeping areas
Burn areas that are 1–5 years old often have edge cover that can be elk magnets thanks to nutrient-rich new growth that animals crave.
Pre-scouting with GPS and mapping apps saves time and boot leather. Getting the lay of the land by investigating areas on a 3D Map can help visualize terrain better than traditional topographic maps. Satellite view reveals natural funnels, hidden drainages, and terrain features that channel animal movement.
Physical & Gear Readiness
Western hunting will humble you physically. Incorporate running, hiking, or biking to build endurance, focus on legs, core, and back to handle physical demands, and train with a weighted backpack to simulate hunting conditions.
But here’s what many hunters don’t consider: glassing itself is physically demanding. Sitting still for hours, fighting eye fatigue, maintaining focus when your mind wants to wander—it’s a different kind of tough.
The Gear Advantage
You can be in perfect shape and know every regulation by heart, but if your glass sucks, you’ll walk right past animals. When you’re hunting in the wide-open country of the West, glassing isn’t just helpful—it’s essential. Animals bed down a mile away and become invisible to naked eyes. Your optics become your most important hunting tool.
Core Gear Checklist: Our Top Recommendations
The gear that works in eastern whitetail woods won’t cut it out west. We’ve field-tested these recommendations through countless hours of actual hunting, not just reading spec sheets.
Essential Optics: Your Eyes in the Field
Here’s how the system works: Binoculars are the primary glassing tool, while a spotting scope can give you a closer look once something catches your eye. Binoculars in the eight to ten power range are ideal for scanning hillsides and basins.
Binoculars do the heavy lifting—scanning large areas with 8x-10x magnification for initial detection. Two-eye viewing means you can glass longer without fatigue, plus you get a wider field of view for catching movement.
Spotting scopes handle confirmation and evaluation. These specialized optics offer magnification levels far beyond binoculars, letting you judge animals from distances that would be impossible otherwise. We’re talking over a mile away in good conditions.
The workflow is simple but critical: Once you find something of interest in your binos, then you can move to the spotter, which should be close to where you were glassing with your binos. Be sure that when you transition from binos to spotter that your spotter is on a lower magnification in order to give you a better field of view and enable you to spot your target sooner.
For spotting scopes, match your hunting style: backpack hunters need scopes weighing 2-3 pounds with 60mm or smaller objectives and variable magnification around 10x-30x. Vehicle-based hunters can handle 85mm scopes weighing seven pounds with 20x-60x magnification. For versatility that works in most situations, a 65mm spotting scope with 15x-45x magnification hits the sweet spot.
Browse our complete selection of hunting spotting scopes to find what matches your hunting style and budget.
Support Systems: Stability and Precision
A quality tripod isn’t optional—it’s what separates successful glassing from frustrated squinting. The second Pillar of Glassing is to mount your binoculars on a tripod. This technique alone changed their success in finding big game animals more than any other single practice.
Look for tripods that balance stability with portability. Carbon fiber reduces weight for backcountry hunts while maintaining the rock-solid stability high-magnification optics demand.
Essential support accessories include:
- Hunting tripods for stable glassing platforms
- Hunting binocular accessories including tripod adapters and harnesses
- Hunting scope mounts and bases for secure attachment
Complementary Optics: Complete Your System
Round out your glassing setup with these tools:
- Hunting rangefinders for accurate distance measurement to spotted game
- Hunting monoculars for lightweight backup optics
- Hunting lens cleaning kits to maintain optical clarity in field conditions
For specialized applications:
- Hunting night vision for low-light scouting
- Hunting thermal optics for detecting heat signatures
Mastering the Glass: Systematic Techniques That Find Game
Having expensive optics means nothing if you don’t know how to use them systematically. Here’s where most hunters fail—they glass randomly, hoping to get lucky.
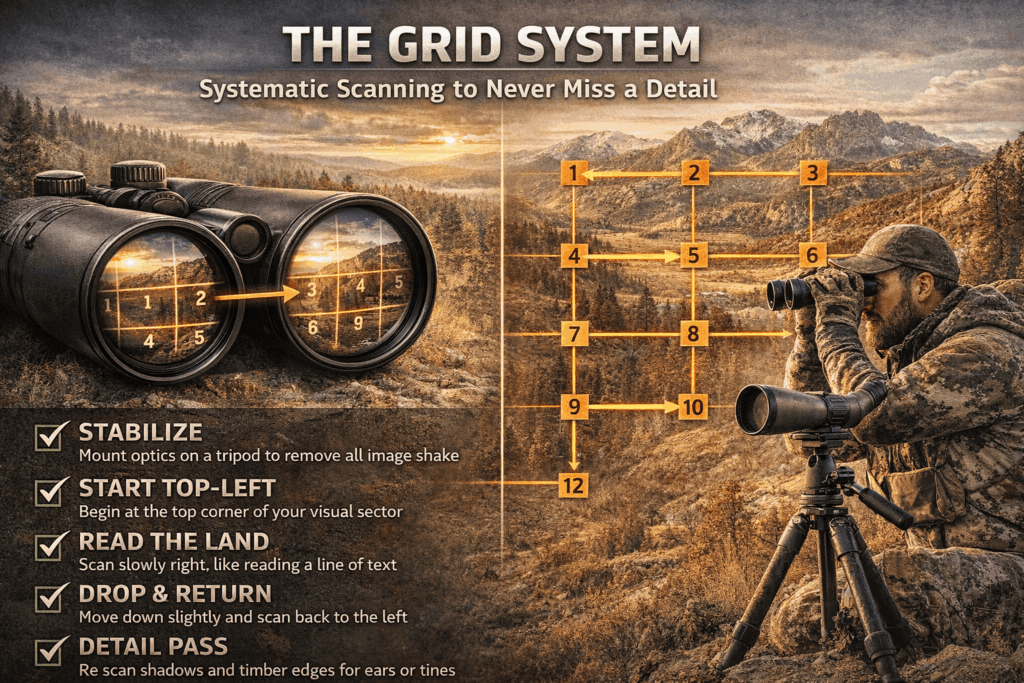
The Grid System: Never Miss What’s There
The grid system is a way to pick apart the area you’re glassing with less of a chance that you’ll miss something. It’s methodical, sometimes boring, but it works.
Here’s the step-by-step process:
- Select Your Glassing Position: Find high ground with clear views of multiple basins, ridgelines, and feeding areas. You want to see into shadows and along timber edges where animals actually spend time.
- Stabilize Your Optics: Mount those binoculars on a tripod. No exceptions.
- Start at the Top Left: Begin scanning at the top left of your viewing area.
- Scan Slowly Right: Move your view slowly to the right, like reading a book. You’re looking for parts of animals—an ear, a leg, antler tips—not whole animals standing in the open.
- Drop Down and Scan Left: When you reach the right edge, drop down slightly and scan back to the left.
- Repeat the Pattern: Continue this systematic pattern until you’ve covered everything.
- Make a Second Pass: Once I’ve looked for the obvious signs of life through the whole area, then I go back through them all again; this time, picking it apart for the finer details. Search in the shadows and dark timber for the commonly unseen like bedded animals, an ear or a tine.
Setting Up for Success: Position and Stability
Where you glass matters as much as how you glass. When selecting a glassing point, western hunters should consider factors like wind direction, sunlight, and available cover to minimize their visibility and maximize their chances of spotting game.
Key position factors:
- Elevation: High ground gives you broader viewing area and better angles into hidden spots
- Sun Position: Glass with the sun at your back when possible to avoid glare; animals facing into the sun are easier to spot
- Wind: Set up with wind in your favor if you plan to stalk after spotting
- Concealment: Conceal yourself. Glassing is still hunting and the sharp eyes that most animals possess will pick you out long before you see them
Tripod stability makes or breaks your glassing success. Taking the shake out of your binoculars is a proven tactic to picking up more animals. Using a tripod is a great addition to your glassing set up. Investing in a good tripod head and a high-quality spotting scope can significantly reduce eye fatigue and enhance image clarity, allowing hunters to glass for longer periods without discomfort.
A quality tripod transforms your glassing effectiveness—explore our hunting tripod selection to find a stable platform that matches your hunting style.
Managing Eye Fatigue: Glass Longer, See More
Eye fatigue kills more hunts than bad weather. In the aspect of glassing, it pertains greatly to eye fatigue. Ever noticed that when you have one eye closed for an extended period the vision in your open eye soon becomes less acute or blurry? That is your eye becoming fatigued due to prolonged use.
Solutions that actually work: learn to glass with both eyes open when using spotting scope, alternate between eyes periodically, take regular breaks to rest your eyes, and use shade to reduce ambient light hitting your optics.
Additional light hitting your eyes or optics can lead to a less clear picture through your binoculars or spotting scope. It is best to glass from the shade, but that is not always possible. Use your jacket to cover up and block the ambient light from hitting the back of your optics.
Species-Specific Glassing Strategies
Different animals require different approaches. What works for elk won’t necessarily work for mule deer, and vice versa.
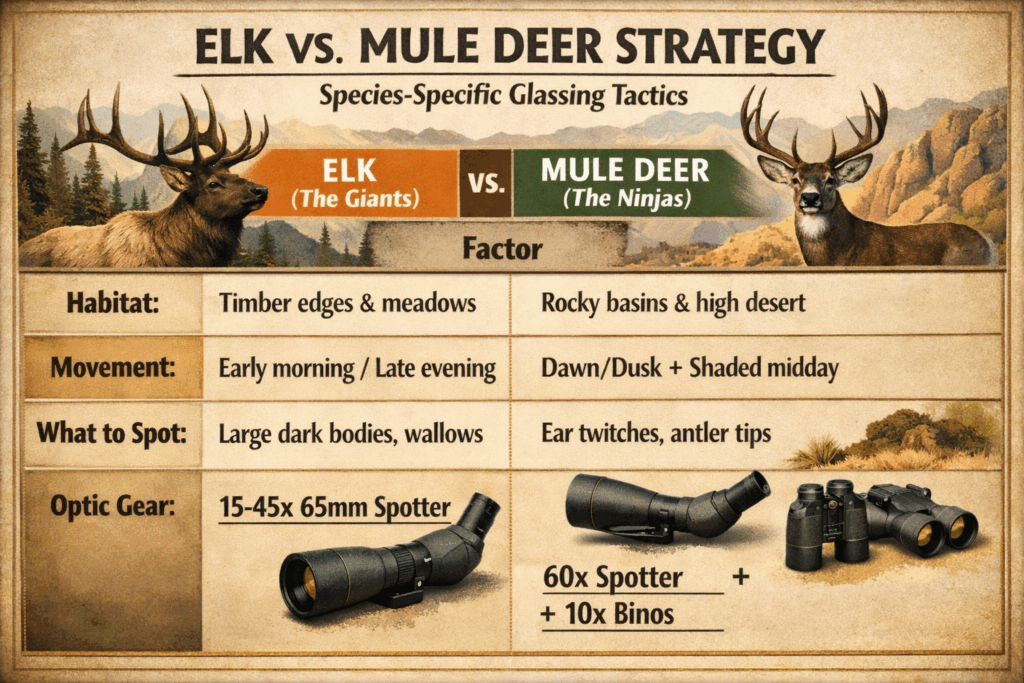
Elk: The Vocal Giants
During September, elk will begin to rut and drop to the middle elevation timbered areas. Focus your glassing on transition zones between timber and meadows, especially during early morning and late evening when elk move to feed.
Look for:
- Large, dark bodies moving through timber edges
- Antler tips catching sunlight above brush
- Groups of animals—elk are social creatures
- Fresh wallows and rubs indicating rutting activity
Mule Deer: Masters of Camouflage
Mule Deer hunting is the ultimate spot and stalk game. They can be found scattered from down in the arid high desert foothills to up in the highest elevation rocky alpine basins.
Mule deer present unique challenges:
- Exceptional camouflage in rocky terrain
- Tendency to bed in scattered locations rather than groups
- Movement primarily at dawn and dusk
- Preference for sloped, shaded bedding areas with good visibility
Use 10x binoculars to quickly glass close-up areas while standing and on the move. When it’s time to sit down and pick the mountains apart, the 10x binoculars and the 60x scope will work in tandem to spot animals and to identify whether something is worthy of closer inspection.
Timing Your Glassing Sessions
Mature bucks move the most at dawn and dusk. Make sure to choose binoculars or a spotting scope with the best low-light performance you can afford. Early morning and late evening light angle can make it easier to spot movement and body shapes, especially in mixed terrain.
Plan your glassing sessions around these peak activity periods, and position yourself to take advantage of favorable lighting conditions.
Advanced Techniques: Taking Your Skills Further
Reading Weather and Conditions
Weather dramatically impacts animal behavior and your glassing success. Hunters can view wind direction and set optimal wind conditions, with wind information coming from over 70k weather stations around the country.
After storms, animals often move to lower elevations or seek shelter in protected areas. Smart hunters use these patterns to predict where game will be and adjust their glassing locations accordingly.
Technology Integration
Modern technology can enhance your glassing without replacing fundamental skills. By attaching a phone to your spotting scope, you can record videos of exactly what you’re observing, allowing you to review the footage later and better analyze the movements and deer you identified. A phone-screen view can also be easier on the eyes during long glassing sessions.
GPS technology lets you mark spotted animals and productive glassing locations for future reference. Over time, this creates a database of information that dramatically improves your success rate.
Team Glassing Strategies
When hunting with partners, coordinate your efforts for maximum coverage. If with a friend or group, the area can be broken up into “sectors of glassing” and everyone can get a slice of the pie.
Establish clear communication protocols and make sure everyone understands the systematic approach to avoid duplicating efforts or missing areas entirely.
More Resources from Hunting Locator
Expand your hunting knowledge and gear selection with these additional resources:
- Complete Optics Selection: Browse our full range of hunting optics including binoculars, spotting scopes, and accessories to build your perfect glassing system
- Rifle Scopes: Complement your glassing setup with precision hunting rifle scopes for when you’re ready to take the shot
- Red Dot Sights: For close-range opportunities, explore our hunting red dot sights for quick target acquisition
- Crossbow Optics: Crossbow hunters can find specialized hunting crossbow scopes designed for their unique needs
- Precision Tools: Ensure your equipment is properly zeroed with our selection of hunting boresighters
FAQ
What magnification spotting scope is best for elk hunting?
For elk hunting, a spotting scope with 15x-45x variable magnification provides the best balance of field of view and detail resolution. This range lets you scan effectively at lower magnifications and zoom in to evaluate antler size and confirm species at higher magnifications. Pair this with a 65mm objective lens for good light-gathering capability without excessive weight.
How far can you effectively glass for game with a quality spotting scope?
With a quality spotting scope in good conditions, you can effectively spot and evaluate large game like elk at distances exceeding 2 miles. However, practical glassing range depends on terrain, lighting, and atmospheric conditions. Most successful glassing occurs within 1-1.5 miles where you can reliably distinguish between species and evaluate trophy quality.
Should I choose an angled or straight spotting scope for hunting?
Angled spotting scopes are generally preferred for hunting because they’re more comfortable for extended glassing sessions, especially when glassing uphill. They also allow multiple hunters to share the scope more easily and provide better ergonomics when mounted on a tripod. Straight scopes are faster to get on target but can cause neck strain during long sessions.
What’s the most important feature to look for in a hunting tripod?
Stability is the most critical feature in a hunting tripod. Look for models with sturdy leg locks, minimal flex under load, and a quality head that allows smooth panning and tilting. Weight is secondary to stability—a slightly heavier tripod that eliminates shake will dramatically improve your glassing effectiveness compared to a lightweight tripod that vibrates in the wind.
How do I prevent eye fatigue during long glassing sessions?
Prevent eye fatigue by learning to glass with both eyes open when using a spotting scope, taking regular breaks every 20-30 minutes, using shade to reduce ambient light on your optics, and maintaining a comfortable sitting position. Alternate between eyes when using single-eye optics, and consider using a jacket or hat to block light from hitting the back of your optics.
When is the best time of day to glass for western big game?
The most productive glassing times are the first two hours after sunrise and the last two hours before sunset when animals are most active. However, don’t overlook midday glassing—bedded animals can often be spotted in shaded areas during the heat of the day, and this is when you’ll face less competition from other hunters.
The Final Shot
Mastering glassing transforms your hunting from wandering hopefully to hunting strategically. The techniques, gear recommendations, and species-specific strategies in this guide represent decades of collective experience from hunters who’ve actually found success in western mountains.
Quality optics, systematic techniques, and persistent practice will elevate your hunting success dramatically. Whether you’re planning your first western hunt or looking to improve your glassing game, the investment in proper equipment and technique pays dividends in the field.
Ready to gear up for your best western hunting season yet? Visit our store today! We stock the best spotting scopes, binoculars, tripods, and optical accessories to ensure your success in the field.