Here’s the thing: finding good hunting land is only half the battle. The real game-changer is knowing exactly where to put your cameras so they actually capture useful intel. Whether you’re working a new lease, familiar property, or trying to crack the code on public land, this guide breaks down everything you need to know about trail camera placement.
You’ll learn:
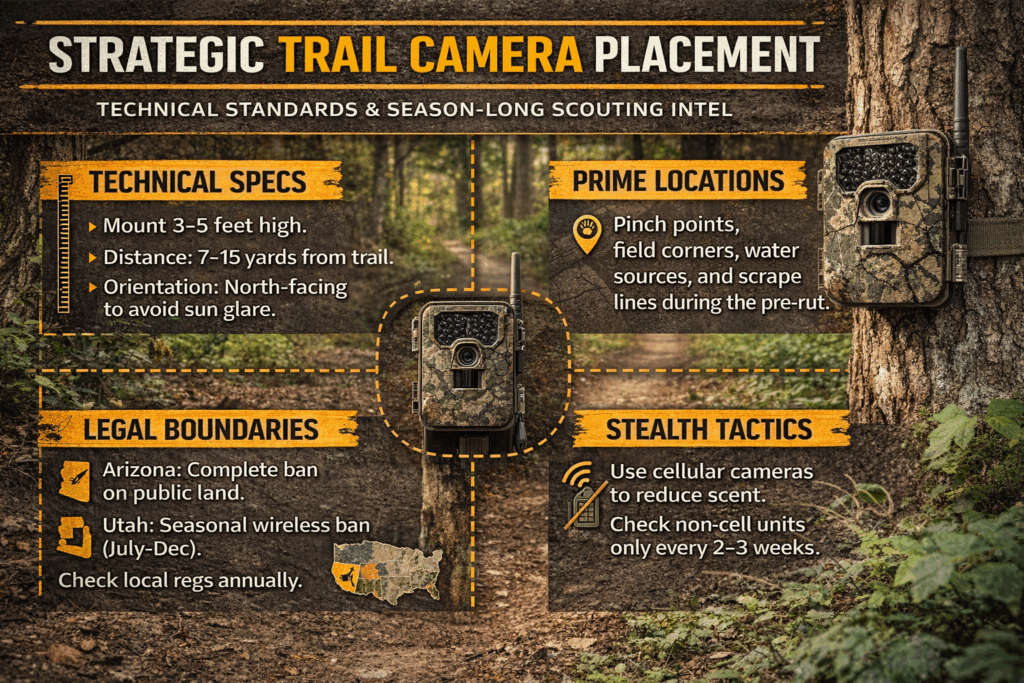
- The exact heights, angles, and distances that consistently produce quality photos
- Prime locations that deliver results all season long
- State regulations that could cost you big if you don’t know them
Let’s dive into the prep work that separates smart scouts from those who waste time and money.
Know Before You Go: Essential Prep
Smart preparation protects your investment and keeps you out of legal trouble. Before you strap your first camera to a tree, there’s groundwork that makes all the difference.
Regulations Check: Know Your State’s Trail Camera Laws
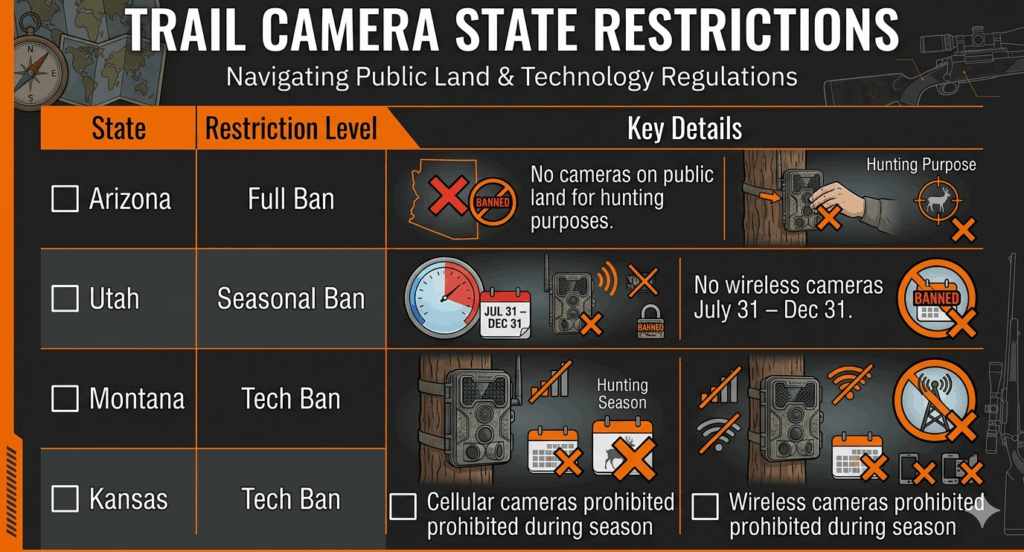
The trail camera landscape has changed dramatically. Arizona banned trail cameras completely on public hunting land in 2021. Utah won’t let you use wireless cameras from July 31 through December 31 during big game seasons.
Here’s what you need to know about current restrictions:
| State | Restriction Type | Key Details |
|---|---|---|
| Arizona | Complete ban | No trail cameras for hunting on public lands |
| Utah | Seasonal/technology ban | No wireless cameras July 31 – December 31 |
| Montana | Technology restriction | Cellular cameras prohibited during season |
| Kansas | Technology restriction | Wireless cameras banned during season |
| New Hampshire | Technology restriction | Cellular cameras prohibited during season |
| Alaska | Technology restriction | Wireless cameras banned during season |
Why the crackdown? Western states are dealing with chaos. Wildlife officials report scenes of hunters and outfitters hanging 30 to 50 cameras on single waterholes, creating massive pressure on elk herds during drought conditions.
Don’t wait until after you buy gear to research regulations. Check your state’s fish and game website every season—these rules change fast.
Action Items: License, Tags, and Permissions
Before deploying cameras, nail down these basics:
- Verify your hunting license covers camera deployment dates
- Check tag requirements don’t conflict with camera use windows
- Get written permission for private land that specifically mentions cameras
- Confirm land management rules (BLM, National Forest, and State lands all have different policies)
Understanding Deer Movement: The Foundation of Smart Placement
Random tree selection leads to random results. Effective camera placement starts with understanding how deer actually move through terrain. Walking every deer trail creates a blood vessel-like network on your map that shows the main arteries deer use to navigate.
This systematic approach reveals primary travel corridors connecting bedding areas, food sources, and water. Your cameras should intercept these routes at strategic points where deer naturally funnel or slow down. Most mature bucks stick to a core area within a ½ mile radius, and this area often shrinks as they age.
Detection Zones and Trigger Speed: Technical Basics
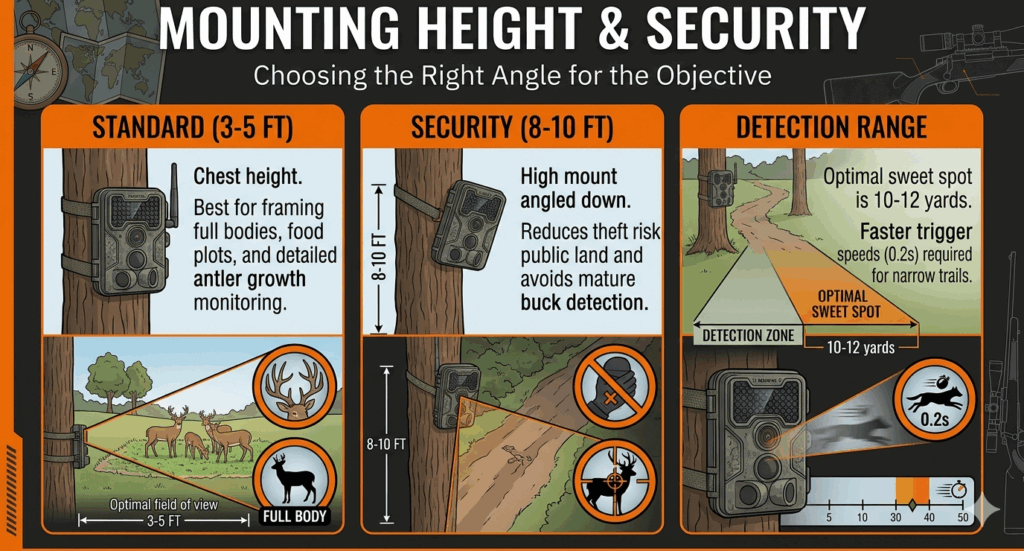
Your camera’s capabilities determine placement success. Most cameras work best at 7 to 15 yards, firing most reliably when animals pass within that sweet spot. Position your camera 10-12 yards from expected deer travel routes for optimal results.
Trigger speed matters just as much. Fast triggers (0.2 to 0.5 seconds) catch quick animals like deer, while slower triggers give you those frustrating empty trail photos.
Trail Camera Height and Angle: Getting the Fundamentals Right
Height depends on your primary goal, but these proven standards work:
Standard deer monitoring: 3-4 feet off the ground (chest height) Security/theft prevention: 8-10 feet high, angled downward
Most experienced hunters agree that chest height, 4 to 5 feet off the ground, works as a solid starting point. Your specific situation might require adjustments based on security concerns, terrain features, and target species.
Standard Height Placement (3-4 Feet)
This traditional height excels for general deer monitoring, food plots, and trail intersections where theft isn’t a major concern. Position cameras 3 to 4 feet off the ground to frame most animals in the shot. Set the camera roughly perpendicular to expected travel paths, angled slightly downward to capture full deer rather than just legs or antlers.
Trail cameras produce clearest images within 3-5 metres of the subject, so align your detection zone with this optimal range. A common mistake is pointing cameras too high, resulting in photos of deer backs with missed antler details.
Elevated Mounting (8-10 Feet) for Security
Bring climbing sticks and hang cameras 8-10 feet up when security is your main concern. This works great on public land, high-traffic areas, or anywhere theft poses real risk. Mounting cameras 8 to 10 feet up and angling down reduces visibility and helps contain IR light.
While elevated mounting might slightly reduce image quality, it dramatically improves security and can actually provide better deer photography by reducing mature buck detection. Proper elevated mounting requires reliable trail camera mounts that allow precise angle adjustment—cheap strap mounts won’t cut it at these heights.
Directional Considerations: Why North-Facing Matters
Trail camera placement requires understanding terrain (Pinch Points), biology (Food/Bedding), and technical rules (North-facing). North-facing cameras avoid direct sunlight that causes washed-out images and false triggers from sun glare.
If north-facing placement isn’t possible due to terrain or travel patterns, angle east or west-facing cameras to avoid direct sunrise or sunset exposure.
Height Quick Reference:
- General deer monitoring: 3-4 feet
- Security-conscious placement: 8-10 feet with downward angle
- Always face north when possible to avoid sun glare
Prime Locations: Where to Place Trail Cameras for Deer
Location trumps camera model every time. Here are five locations that consistently produce quality deer photos:
- Game trail intersections and pinch points
- Food plot edges and field corners
- Water sources (especially during dry conditions)
- Scrape lines and rub clusters
- Bedding area transition zones
Game Trails and Pinch Points
Pinch points provide incredible intel on buck movements. These terrain features funnel deer through predictable corridors—creek crossings, fence gaps, narrow strips between fields, or saddles in ridgelines.
Position cameras facing across trails rather than down them, placing them 7-15 yards from expected crossing points. This angle captures deer approaching, crossing, and leaving, providing maximum information about movement patterns and timing.
Food Sources: Plots, Fields, and Mast
Field edges are incredibly productive summer locations where corn and beans create security cover that funnels deer traffic between field edges and fence rows or timberlines. Instead of placing cameras in the middle of food plots, position them on entry and exit trails where deer approach feeding areas.
Focus on field corners, fence crossings, and natural openings in cover that deer use to access food sources. These locations stay productive from summer through early fall, before hunting pressure significantly changes movement patterns.
Water Sources
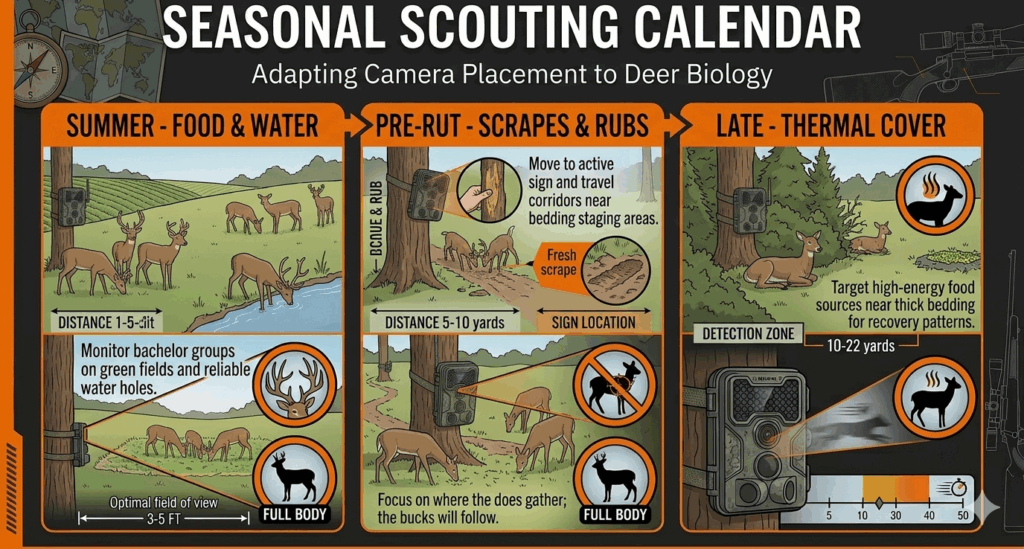
Water cameras become critical during hot, dry periods when deer concentrate activity around reliable water supplies. Position cameras 10-15 yards from water’s edge on the most heavily used approach trail rather than directly over the water source.
In Western hunting scenarios, be aware that hunters and outfitters hanging 30 to 50 cameras on single waterholes has become a major issue. Consider finding secondary water sources that receive less pressure but still attract deer consistently.
Scrapes and Rub Lines
These locations become highly productive during pre-rut and rut phases when buck activity intensifies. Ridges, benches, and timbered terrain often yield higher percentages of buck photos than pinch points or food sources, with focus areas including bedding areas, scrape lines, and rub lines.
Position cameras 8-10 feet from active scrapes, facing the scrape rather than approach trails. For rub lines, place cameras perpendicular to the line of rubs, focusing on the largest, freshest sign.
Bedding Area Approaches
This advanced strategy requires careful execution to avoid pressuring deer. Hanging cameras on well-used trails in proximity and downwind of verified beds works well, as bucks often travel just above that top line of topography scent checking for estrus does.
Only attempt bedding area cameras after you’ve identified bedding locations through other scouting methods. Leaving trail cam locations alone for weeks at a time allows the placement to perform free from human intrusions, which is especially critical near sensitive bedding areas.
Need reliable cameras for these key locations? Browse our trail camera selection to find the right fit for your scouting needs.
Seasonal Placement Strategies: Adapting Throughout the Year
If you’ve made the mistake of leaving trail cameras on the same tree from opening day until post-rut, it’s time to start looking at the calendar and designing a better strategy for different seasons. Your camera placement should evolve as deer behavior changes through summer, pre-rut, rut, and post-rut phases.
Summer Scouting (June-August)
Focus cameras on food sources and water during summer when bachelor groups are predictable and follow consistent patterns. However, anticipate green up—if you place a camera in June, things will grow taller. Check camera angles monthly as vegetation grows to ensure your detection zone stays clear.
Early Season Transition (September-October)
Deer begin changing patterns as we transition from summer into early bow season. Bachelor groups break up, and deer transition to fall patterns focused on different food sources like acorns and late-season crops.
Move cameras from summer food sources to travel corridors between bedding areas and new food sources. This transition period offers excellent opportunities to pattern deer before hunting pressure significantly alters their behavior.
Pre-Rut and Rut (Late October-November)
This phase represents prime time for scrape and rub line cameras. During the rut, it’s all about identifying key feeding areas for does. While moving cameras more frequently increases spooking risk, during the rut when deer are changing movement patterns, the risk is worth the reward.
Focus on doe feeding areas and travel corridors, as bucks will be searching these locations for estrus does.
Post-Rut Recovery (December-January)
After rut intensity, deer focus on recovery and feeding. Cameras should return to food sources, but now emphasize high-energy foods that help deer recover body condition. Late-season food plots, standing crops, and thermal cover areas near food sources become prime locations.
Advanced Placement Techniques for Mature Bucks
Mature bucks require specialized strategies that account for their heightened awareness and survival instincts. Mature bucks don’t live five, six, or seven years by luck—they’re adaptive survivors, hyper-aware of change, pressure, and intrusion.
Minimizing Human Pressure
When cameras are placed in staging areas, hunters should limit how often they check cameras and use cellular cameras whenever possible. Frequent visits to camera locations are time consuming and deposit human scent, deterring any decent buck from visiting.
Consider investing in cellular trail cameras for locations where mature buck activity is suspected. This technology eliminates frequent site visits that can pressure deer and alter their patterns.
Flash Considerations for Wary Bucks
For areas with heavy mature buck activity, consider true no-glow cameras or strategic placement that minimizes direct flash exposure to deer faces.
Data Analysis for Pattern Recognition
One approach involves logging every daylight picture of a target buck, noting timestamp, location, and specific wind direction for each photo. This detailed analysis helps identify specific conditions that trigger daylight movement in mature bucks.
Create a systematic approach to data collection that includes weather conditions, moon phase, hunting pressure levels, and seasonal timing for each photo.
Essential Gear for Trail Camera Success
Proper equipment makes the difference between successful camera deployment and frustrating failures. Beyond the camera itself, several accessories significantly improve your results and protect your investment.
Power Solutions That Last
Good quality lithium batteries like Energizer Ultimate Lithium last longer, making them more cost effective than alkaline equivalents. Lithium batteries perform reliably in cold weather and provide consistent power output throughout their life cycle.
For extended deployments, consider trail camera batteries and solar panels that provide continuous power without frequent battery changes.
Security and Mounting Solutions
Trail camera theft remains a significant concern, especially on public land. Trail camera security boxes and locks provide essential protection for your investment while allowing normal camera operation.
Quality mounting systems ensure proper camera positioning and reduce movement that can cause blurry photos or misaligned detection zones. Trail camera mounts and viewers offer flexible positioning options for different terrain types and security requirements.
Memory and Storage Considerations
Choose SD cards appropriate for your camera’s capabilities and expected photo volume. If I’m running video, I’ll run 16s or 32s referring to 16GB or 32GB SD card sizes that provide adequate storage without excessive cost.
For beginners, standard SD cards in the 16-32GB range provide excellent value and sufficient storage for most applications.
More Resources from Hunting Locator
Maximize your hunting success with these additional resources designed to help you find great hunting opportunities and make the most of your time in the field:
- Trail Camera Store – Complete selection of trail cameras, from budget-friendly options to premium cellular models with the latest technology
- Cellular Trail Cameras – Remote monitoring solutions that eliminate frequent site visits and reduce pressure on game
- Camera Accessories – Power solutions, security boxes, mounts, and everything you need for successful camera deployment
- Security Solutions – Protect your investment with locks, security boxes, and theft-prevention accessories
FAQ
What’s the best height to mount a trail camera for deer?
Most experienced hunters agree that chest height, 4 to 5 feet off the ground, works as a solid starting point. For security concerns, mounting cameras 8 to 10 feet up and angling them down provides theft protection while maintaining photo quality.
How far should I place my camera from a deer trail?
Most cameras work best at 7 to 15 yards, firing most reliably when animals pass within that range. Position your camera 10-12 yards from expected deer travel routes for best results.
Can I use trail cameras on public land?
Trail camera regulations vary significantly by state. Arizona banned trail cameras completely on public hunting land in 2021, while Utah prohibits wireless trail cameras from July 31 to December 31 during big game seasons. Always check your state’s current regulations before deploying cameras.
How often should I check my trail cameras?
Leaving trail cam locations alone for weeks allows the placement to perform free from human intrusions. For mature buck areas, minimize visits by using cellular cameras when possible. Check non-cellular cameras every 2-3 weeks during peak activity periods.
What’s the difference between infrared and white flash cameras?
Even “no-glow” infrared cameras emit some infrared light when capturing nighttime images. For younger deer this might cause curiosity, but older bucks may learn to avoid that invisible spotlight. White flash provides better image quality but may spook deer, while infrared offers stealth at the cost of some image clarity.
When is the best time to move trail cameras?
During the rut, it’s all about identifying key feeding areas for does. While moving cameras more frequently increases spooking risk, during the rut when deer are changing movement patterns, the risk is worth the reward. Move cameras seasonally to match changing deer behavior, but minimize moves during sensitive periods near bedding areas.
The Final Shot
Strategic trail camera placement transforms random scouting into precise intelligence gathering. By understanding deer movement patterns, choosing optimal locations, and adapting your strategy throughout the season, you’ll capture photos that lead to successful hunts. Remember that regulations vary by state, mature bucks require specialized approaches, and consistent monitoring provides the best long-term results.
The difference between empty SD cards and valuable scouting intelligence lies in applying these proven techniques systematically. Start with the fundamentals—proper height, optimal detection range, and strategic location selection—then refine your approach based on specific deer behavior in your hunting areas.
Ready to upgrade your trail camera game with reliable equipment that delivers results? Visit our trail camera store today! We stock the best cameras, cellular models, security solutions, and accessories to ensure your scouting success this season.