That’s what happens when you’ve got cameras working around the clock, giving you intel you’d never get otherwise.
Trail camera experts put it perfectly: these things “don’t sleep, providing a continuous, unbiased record regardless of human schedules.” And honestly? That’s exactly what you need when you’re trying to manage land or scout a property you can only visit a couple times a year.
The game has changed completely. Modern trail cameras aren’t just hunting gadgets anymore—they’ve become “indispensable gadgets for security, wildlife monitoring, evidence gathering, and personal discovery.”
Here’s what we’re going to cover:
- Cellular vs. traditional cameras (and which one actually makes sense for your situation)
- Where to put these things so you get useful data instead of 500 pictures of empty woods
- How to turn all those photos into an actual plan that gets you in front of deer
Your cameras are an investment. Let’s make sure you’re getting your money’s worth.
Know Before You Go: Essential Prep for Trail Camera Success
Nothing kills a good scouting plan faster than having your cameras confiscated because you didn’t check the rules first. And trust me, the regulations are all over the place. Trail camera legality “depends on the jurisdiction, the land management agency, the intended use, and the type of camera involved.”
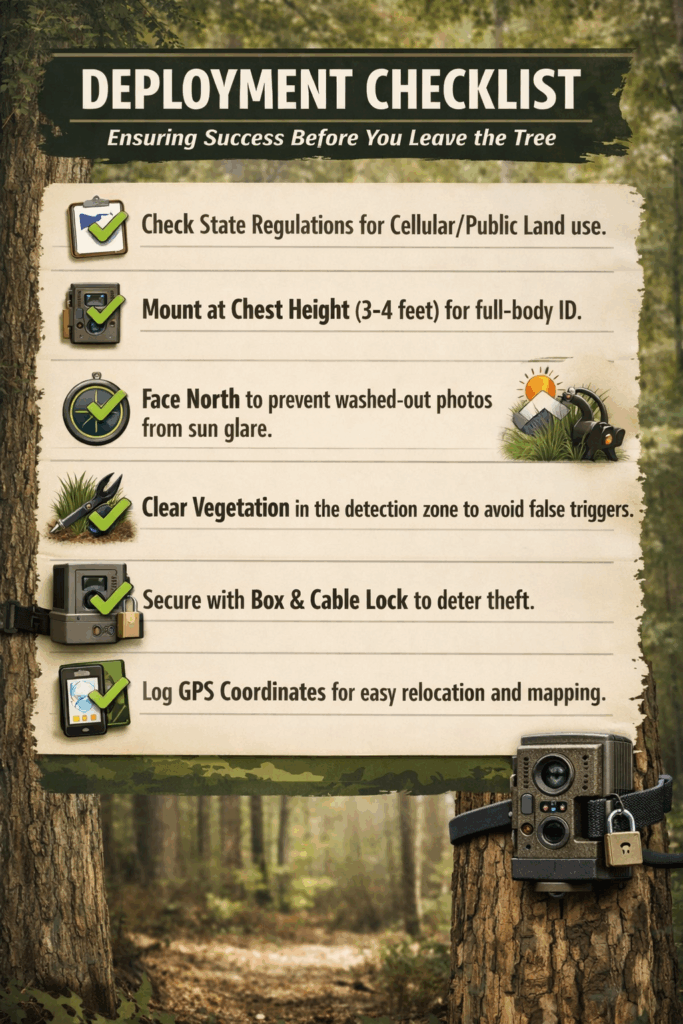
Regulations Check: Know the Rules Before You Deploy
Every state handles trail cameras differently. Some ban cellular cameras during hunting season. Others don’t allow any cameras on public land, period. Here’s what you need to check:
- Hit your state wildlife agency’s website for current rules (they change more than you’d think)
- Public vs. private land makes a huge difference in what’s allowed
- Seasonal restrictions are common (especially during actual hunting seasons)
- Cellular cameras get treated differently than regular SD card models
Planning an out-of-state hunt? Don’t assume anything. What’s legal in your home state might get you in trouble somewhere else. Do your homework before you make the drive.
License and Tag Timing
Here’s something people miss: sync your camera deployment with when you’re actually getting your tags. If you’re using cameras to scout for a specific hunt, make sure you’ve got your licensing situation figured out first. For non-residents especially, tag allocations are limited and application deadlines can be months before season.
Get your cameras out early enough that the data actually helps you decide which units to apply for and which seasons to target. Otherwise you’re just taking pictures for fun.
What Your Cameras Reveal: Seasonal Wildlife Intelligence
Trail cameras give you insights “into seasonal shifts, animal behavior, and property usage that help you make more informed decisions. Over time, trail cams reveal long-term patterns, pinpoint problem areas, and offer a clear view of what’s really happening on your property.”
Think of it this way: your cameras are doing surveillance when you’re not there. But they need to be watching all year to give you the full picture of how deer actually use your property.
Spring & Summer: Establishing Baselines
Spring and summer tell you which bucks made it through winter, how their antlers are developing, and where they’re hanging out before hunting pressure changes everything.
What to focus on:
- Food sources are king during this time—food plots, field edges, anywhere deer are feeding regularly
- Water becomes critical when it gets hot, so monitor those sources closely
- Count fawns and does to understand your population dynamics
- Bachelor groups are predictable before they break up in fall
For land managers, this is when you figure out what’s working and what isn’t. If deer are consistently avoiding certain areas, there’s usually a reason worth investigating.
Fall: Pre-Season Intelligence Gathering
Fall changes everything. Bucks start moving more, scrapes appear, and the data you collect now directly impacts where you hang your stands.
Where to focus your attention:
- Fresh scrapes and rub lines show you current activity, not last year’s
- Pinch points and funnels become even more valuable as movement increases
- Concentrate cameras where you’re seeing mature buck activity
- Track feeding pattern changes as natural food sources shift
If you’re hunting out of state, fall camera data from 2-4 weeks before your hunt is gold. When you start seeing bucks moving in daylight, you know the rut’s ramping up.
Winter: Post-Season Patterns
Winter shows you who survived hunting season, where deer concentrate when food gets scarce, and starts building your target list for next year.
Winter priorities:
- Food source monitoring becomes critical as options shrink
- Identify winter concentration areas and preferred cover
- Start cataloging next year’s bucks for your hit list
- Watch body condition to gauge herd health
This data drives your spring habitat projects. If all your deer are hammering one small area, you probably need to diversify food sources to spread them out.
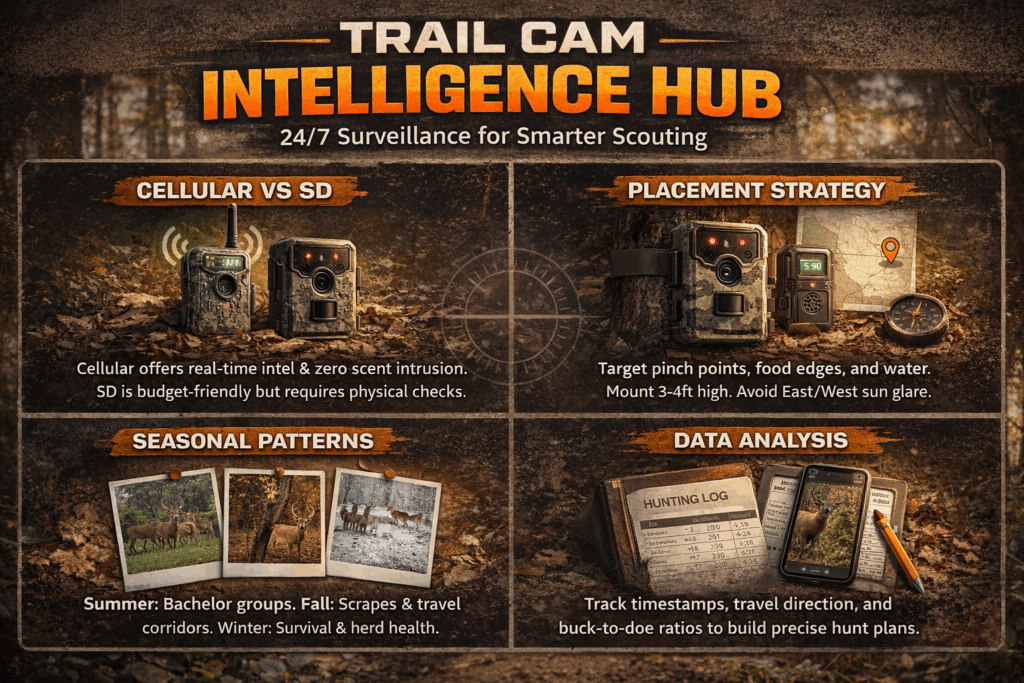
Reading the Signs: Interpreting Camera Data
Don’t just look at whether there’s a deer in the photo. Pay attention to what the image actually tells you:
| What You’re Seeing | What It Means | What You Should Do |
|---|---|---|
| Consistent time stamps | Reliable travel patterns | Plan your sits around these windows |
| Direction of travel | Bedding to feeding movement | Position to intercept these routes |
| Relaxed vs. alert posture | Comfort level in that area | Focus on areas where deer look comfortable |
| Buck to doe ratios | Population balance and pressure | Adjust your harvest strategy |
Modern cameras with fast trigger speeds give you way better data. A deer centered in the frame tells you a lot more than a deer’s butt disappearing off screen.
Trail Camera Technology: Matching Features to Your Needs
The trail camera market is overwhelming. Dozens of brands, confusing specs, prices from $50 to $500+. Here’s what actually matters for getting useful data.
Cellular vs. Traditional: The Core Decision
This decision shapes everything else about your setup.
Cellular Trail Cameras:
- Perfect for: Remote properties, out-of-state scouting, when you can’t check cameras regularly
- The big advantage: Real-time images “allow hunters to learn about wildlife without setting foot in the woods other than to change batteries or move a camera”
- What it costs: Tactacam’s $5 per camera plan is simple with no commitment, while Spypoint gives you 250 photos monthly per camera, with unlimited photos for $120 yearly
Traditional (SD Card) Cameras:
- Perfect for: Properties you visit regularly, tight budgets, areas with poor cell service
- The big advantage: Lower costs upfront and ongoing, no connectivity headaches
- The downside: You have to physically visit to get data, which can mess with deer patterns
If you’re scouting land you can only visit once or twice before hunting, cellular isn’t a luxury—it’s practically required. Check out cellular options that work in your area.
Key Specifications That Actually Matter
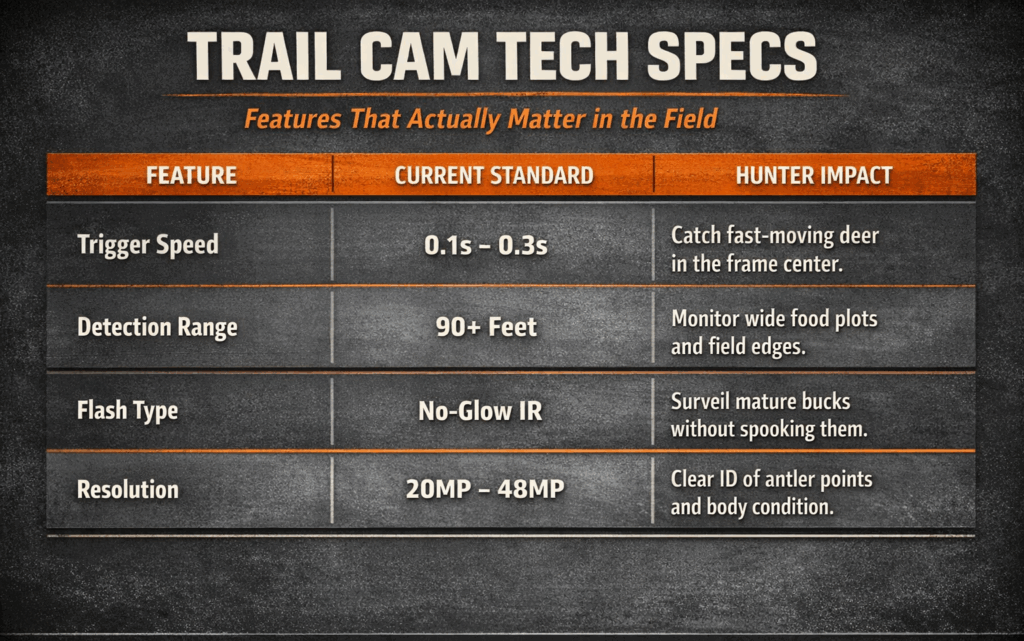
Ignore the marketing fluff. Here’s what impacts real performance:
Trigger Speed:
- Why it matters: Fast triggers catch deer in frame instead of walking out of it
- What’s possible: Some 4G cameras trigger in 0.1 seconds
- What you need: 0.3 seconds or faster for trail monitoring
Detection Range:
- Why it matters: How far out the camera “sees” movement
- Current standard: 90-foot detection range is common in decent cameras
- Matching to use: Wide food plots need longer range than narrow trails
Flash Type (IR/No-Glow):
- Why it matters: Visible flash spooks deer; no-glow is invisible to them
- The advantage: No-glow flash on premium cameras “don’t spook deer and still provide exceptional range”
- Worth the cost: For mature buck surveillance, absolutely
Image/Video Quality:
- What’s available now: Some 4G cameras capture 48MP stills and 1296p or 1080p HD video
- What you actually need: 20MP+ handles most identification needs just fine
Power Solutions for Year-Round Operation
Battery life frustration is real, especially with cellular cameras. Batteries can be frustrating with cellular cameras “since it takes a lot of power to link up to cellular service and send pictures.”
Your power options:
| Power Solution | Best For | Main Benefit | Cost Level |
|---|---|---|---|
| Lithium Batteries | Cold weather, long deployments | Last way longer than alkaline | Higher upfront, cheaper long-term |
| External Battery Packs | Remote spots, infrequent visits | Dramatically extended runtime | Moderate investment |
| Solar Panels | Year-round deployment, remote locations | Keep battery at 100% without direct sunlight | Higher upfront, minimal maintenance |
For true year-round surveillance without constant battery swaps, solar and external battery solutions keep your cameras running through every season.
Trail Camera Placement Strategy: Maximizing Your Intelligence Network
The best camera in the world is useless if it’s watching empty woods. Placement strategy separates useful data from wasted money.
Step 1: Identify High-Value Locations
Research shows “deer like to be in areas where hunters don’t go, particularly mature bucks, who are found in out-of-the-way areas that are difficult to access.”
Priority locations:
- Pinch Points: Natural funnels like saddles, creek crossings, fence gaps
- Food Sources: Food plot edges, oak ridges, field corners
- Water Sources: Especially valuable during dry spells and early season
- Travel Corridors: Trails connecting bedding and feeding areas
- Scrape Lines: During pre-rut and rut phases
- Staging Areas: Thick cover next to food sources where bucks wait for dark
For unfamiliar territory, use mapping apps to identify likely spots before you ever visit. Then confirm with cameras.
Step 2: Optimize Camera Height and Angle
Mounting basics:
- 3-4 feet high for deer (chest height captures body and antlers)
- Slight downward angle on trails, level on food plots
- Avoid pointing east or west (sun glare ruins photos)
- Clear vegetation that triggers false captures
Most common mistake? Mounting too high. You’ll get backs and antler tops instead of the full picture you need for ID.
Step 3: Consider Security and Concealment
Camera theft happens, especially on public land or leased property. Strategically placed cameras act “as a powerful deterrent against trespassers. When people see cameras, they’re more likely to stay away or think twice before entering private land.”
Security strategies:
- Security boxes and cable locks on every camera
- Higher positioning angled down (harder to spot, better theft deterrence)
- Camouflaged locations that blend naturally
- Avoid obvious spots like lone trees in open areas
Security boxes and locks protect your investment while keeping surveillance effective.
Step 4: Create a Systematic Grid
Instead of random placement, be systematic:
- Map your property and identify habitat types
- Establish camera zones based on terrain and expected deer usage
- Plan seasonal rotation to follow changing patterns
- Document GPS coordinates for easy relocation
- Schedule regular checks based on camera type and battery life
Mounts and viewers streamline deployment and data collection.
Turning Data Into Hunt Plans: From Surveillance to Success
Raw camera data is worthless without proper interpretation. Here’s how to transform surveillance into actionable hunting strategies.
Pattern Recognition and Analysis
Daily Activity Windows:
- Analyze timestamps for consistent movement times
- Track seasonal shifts as daylight changes
- Note weather correlations that trigger increased movement
- Watch moon phase patterns with daylight activity
Travel Route Mapping:
- Connect camera locations showing the same animals at different times
- Identify primary corridors with consistent traffic
- Map seasonal changes as food sources and pressure shift
- Find bottlenecks where multiple routes converge

Stand Placement Strategy
Use camera data to eliminate guesswork:
Wind Considerations:
- Check wind direction during peak activity times in your photos
- Plan multiple stands for different wind scenarios
- Consider thermals revealed through consistent deer approach angles
Timing Optimization:
- Match hunt timing to peak camera activity
- Plan entry/exit routes that avoid documented deer travel
- Schedule around weather patterns that historically increase movement
Seasonal Adaptation
Your camera network should evolve with deer behavior:
Pre-Season (August-September):
- Focus on food and water during hot weather
- Monitor bachelor group breakup as bucks become territorial
- Track early scrape activity in traditional spots
Peak Season (October-November):
- Shift to travel corridors and scrape lines
- Increase monitoring frequency during peak rut
- Focus on doe bedding areas where bucks will search
Post-Season (December-February):
- Monitor survival rates and winter stress
- Track food preferences during harsh weather
- Plan next year’s habitat improvements
More Resources from Hunting Locator
Get the most from your trail camera investment:
- Trail Camera Store – Complete selection for every budget and application
- Cellular Trail Cameras – Real-time monitoring for remote properties
- Batteries and Solar Panels – Power solutions for year-round operation
- Security Boxes and Locks – Protect your investment
- Mounts and Viewers – Professional mounting and data management
FAQ
How many trail cameras do I need for effective property surveillance?
Depends on your property size and goals. For good coverage, figure one camera per 20-40 acres, with more concentrated around high-traffic spots like food plots and water. Start with 3-4 cameras to learn patterns, then expand based on what you discover.
Can I use trail cameras on public hunting land?
Trail camera legality on public land “depends on the jurisdiction, the land management agency, the intended use, and the type of camera involved.” Always check with the specific agency managing that land before deploying cameras.
How often should I check my trail cameras?
For SD card cameras, every 2-4 weeks during active periods. Cellular cameras eliminate physical checks except for battery changes and maintenance. Avoid checking during peak hunting season to minimize disturbance.
What’s the best time of year to start using trail cameras?
Start in late spring or early summer to establish baseline patterns before hunting pressure changes deer behavior. Year-round monitoring gives you the most valuable data for management decisions.
Do trail cameras spook deer?
No-glow flash on premium cameras “don’t spook deer and still provide exceptional range.” Proper placement and quality equipment minimize any negative impact on deer behavior.
How long do trail camera batteries last?
Varies significantly based on camera type, settings, and conditions. Cellular cameras are tough on batteries “since it takes a lot of power to link up to cellular service and send pictures.” Lithium batteries and solar panels extend operation significantly.
The Final Shot
Trail cameras have evolved from simple hunting tools into sophisticated land management systems providing 24/7 intelligence on wildlife patterns, property security, and habitat effectiveness. Trail cameras aren’t just for hunting season anymore—more landowners rely on them year-round to make informed property decisions.
Whether you’re planning your first out-of-state hunt or managing hundreds of acres for trophy potential, the right trail camera system gives you intelligence that separates successful hunters from those relying on luck.
Ready to build your surveillance network? Check out our trail camera store today. We’ve got everything from budget starter cameras to premium cellular systems with solar power—everything you need to keep eyes on your hunting land year-round.